New Snorkel benchmark leaderboards. See the results.
Using Snowflake Connector in Snorkel Flow
As part of Snorkel AI’s partnership with Snowflake, users can now upload millions of rows of data seamlessly from their Snowflake warehouse into Snorkel Flow via the natively-integrated Snowflake connector. With a few clicks, a user can upload massive amounts of Snowflake data and quickly develop high-quality ML models using Snorkel Flow’s Data-Centric AI platform.
Snowflake’s cloud-based data warehousing platform has gained widespread popularity in recent years due to its ability to handle large amounts of data, including unstructured data. The platform accommodates data from a wide range of sources, including traditional relational databases, NoSQL databases, and data stored in cloud storage platforms such as Amazon S3 or Azure Blob Storage. Users can then curate this amalgam of data and operationalize it to gain insights and value through AI.

The cost of labeling data
One of the most painstaking and time-consuming issues with developing AI applications is the process of curation and labeling.
Snorkel solves this bottleneck with Snorkel Flow, a novel data-centric AI platform. Data science and machine learning teams use Snorkel Flow’s programmatic data labeling to intelligently capture knowledge from various sources—such as previously labeled data (even when imperfect), heuristics from subject matter experts, business logic, and even the latest foundation models—and then scale this knowledge to label large quantities of data.
As users integrate more sources of knowledge, the platform enables them to rapidly improve training data quality and model performance using integrated error analysis tools.

Choosing the Snowflake connector in Snorkel FLow
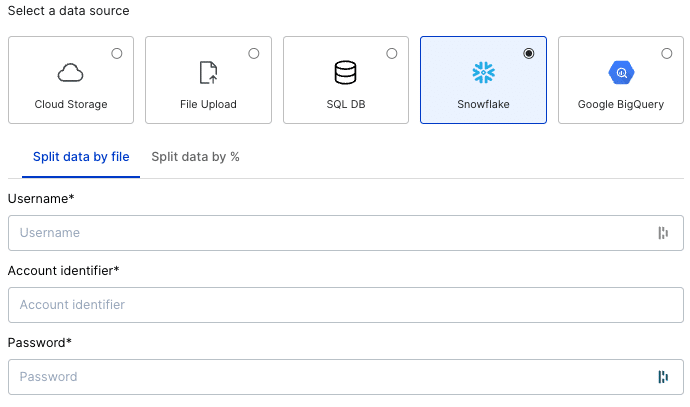
To illustrate how to upload data from a Snowflake warehouse, we’ll walk through an example. To start, we create a dataset and choose the Snowflake option under “Select a data source.”

Once we select Snowflake as our data source, we have two options: “Split data by file” and “Split data by %.” If our target data is pre-partitioned into training, validation, and test splits, we can select the “Split data by file” tab and write queries for each split.
For data without a pre-determined split, the “Split data by %” option allows us to specify percentages for each split. Once we specify our splits, the feature randomly partitions data into each split.
For the sake of this example, we will select “Split data by file” even though we don’t have data pre-partitioned
Logging into Snowflake
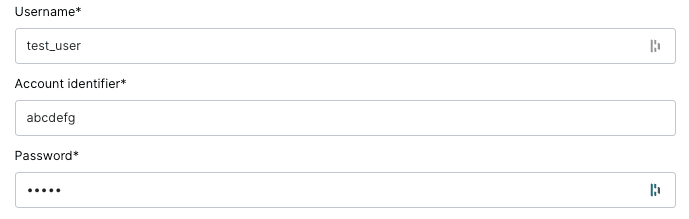
Once we select “Split data by file” or “Split data by %,” form fields appear that allow us to enter Snowflake access credentials.
The interface requires three pieces of information to access a warehouse: the account identifier, username, and password. The account identifier is normally found in the URL associated with a Snowflake account (e.g. https://<account_ID>.snowflakecomputing.com). The username and password are tied to specific users for a Snowflake account.
Different users may have different roles and thus different permissions for each warehouse. Specifying the right username and password is critical for accessing the correct data. To make sure these sensitive credentials are never exposed, all credentials are encrypted end-to-end.
For this example, we’ll enter some dummy account credentials:
Writing Snowflake queries for training data
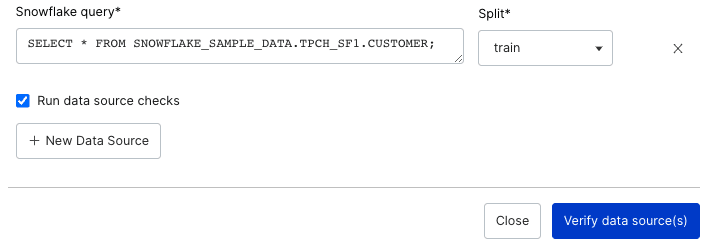
With the credentials entered, we can now write Snowflake queries to access a warehouse’s data. (For more guidance on how to write a Snowflake query, check out this link.)
In this example, we pull data from the SNOWFLAKE_SAMPLE_DATA warehouse with the following query:
SELECT * FROM SNOWFLAKE_SAMPLE_DATA.TPCH_SF1.CUSTOMER;
We can select which split we want this query’s data to apply to. For the sake of this example, we will select “train” as the split. (We recommend adding validation and test splits for an ideal data-centric AI workflow, but we will only create a train split for this example.) Additionally, checking the “Run data source checks” box will identify any inconsistencies in our data’s schema or content, helping us handle any issues with our data during the upload phase.
As a note, this query will use the logged-in user’s default warehouse. Snorkel Flow does not currently support Snowflake “USE” commands to specify a warehouse—though we may support that functionality in a future release.
In the future, we plan to develop a number of enhancements to the Snowflake connector, including OAuth-based authentication and deeper unstructured data support.
Once we enter all the required information, the “Verify data source(s)” button will become clickable, allowing us to validate the input and ensure we can connect to the Snowflake warehouse.
Selecting the unique ID
Once we have validated our data access, we can select a UID column. The dropdown will display each column in the data source that contains unique values. We can choose any one of them to act as our unique identifier (UID).
If the dataset contains no unique columns, we can select “Snorkel Flow Generated” in the dropdown to auto-generate a UID column.
For this example, we select the `C_CUSTKEY` column.

Completing the process
With credentials entered, queries specified, and our UID selected, we can now click the “Add data source(s)” button. Snorkel Flow will then ingest the dataset, making it immediately referenceable throughout the platform.
That rounds out the entire process and shows that—In just a few minutes, with just a few clicks and commands—we can easily make any kind of data from Snowflake quickly available on Snorkel Flow.
To learn more about Snorkel Flow and see if it might serve your team, request a demo today.

Vashisht Madhavan